Thursday, August 23, 2012
Creating Outlined Text (or Objects) Using Inkscape
A little, basic tutorial showing how I go about creating a simple text design in Inkscape and add a texture/pattern to the text design using GIMP. Although I am using text here this basically can apply to objects you create in Inkscape as well.
There are three methods that I know of for creating an outline around text in Inkscape.
One is to simply use the stroke option and set the stroke to whatever number thickness you want. However, the stroke fills both the inside and outside of your text, so if you use a large thickness it can end up looking as shown in the first example shown below.
The second optiom is to create a copy of the text and use the Outset option to create an "outline" behind the text.
The third is to create a copy of the text and use the Dynamic Offset tool to create an "outline" behind the text. This third method creates a rounded appearance.
Update: You can use any of these options as a background for your text to create an outline. Just create your text, duplicate it, create your stroke or outline, change the color to what you want your outline to be, then move it back behind your main text.
So how do you create these three different looks?
1. Open Inkscape.
2. Type in your text. (If you plan to add a pattern to the lettering, as the original idea for this tutorial was going to include, I suggest a thick/fat font).
Adding a Stroke to Text:
There are a few different ways to add a Stroke to text or objects in Inkscape. Here is how I usually do it.
Hold the Shift key down and click on the color you want the stroke to be from the color palette at the bottom of the screen. Once you've done that a number appears next to the Stroke area. Right click on that to get a pop up menu of different numbers to choose from. Click on one of those numbers.
Methods for Adding a Background Outline to Text:
Select the text and press CTRL+D on the keyboard to duplicate the text (or select Edit > Duplicate). Select the fill color to be what you want the outline to be. Lower selection to the Bottom (there are a few ways of doing this...one simple way is to select the item and press the Page Down key on your keyboard).
Then choose one of the following:
Method One (Outset):
Select Path > Outset, or use the shortcut keys of ctrl + 0 (that's a zero...Inkscape shows this shortcut as ")ctrl + )" but I find that confusing, it makes me think I need to hold down the shift key to use the parenthesis symbol, but I have never needed to). Repeat until you have the desired thickness for the letters outline.
Method Two (Dynamic Offset):
Select Path > Dynamic Offset, or use the shortcut keys of ctrl+J. When you do that a little tiny diamond shaped node will appear. Use your mouse to click on the node and drag the node out to increase the size of the object (you can also go in if you want to decrease its size).
GIMP Grunge Tutorial
This is a grunge method using GIMP that I used for working on a large image where I didn't want to use grunge brushes, except maybe for touching up smaller areas.
1. Open a photo of something with a lot of texture in GIMP. (I used an image of a photo I took of part of some metal that was rusty, had peeling paint, gouges, etc. in it. You can also find pictures like this online that are free for commercial use. You can try searching for things like "free textures" or "free textures for photoshop", etc and find some. Here is one source. http://mayang.com/textures)
2. Click on Colors in the menu bar. Chose "Threshold." This turns the layer into a black and white image (you can mess with the options to get the balance of white and black that you want). Click on Okay when you are done. If you like you can also then click on Colors from the menu and then Invert to switch the black and white colors.
3. Add the image you want to "grunge up" as a new layer. (You can do this by clicking on Files and then Open as Layers.)
4. Use the color select tool to either select the white or black part of the texture (choose whichever one you think will give you the results you want).
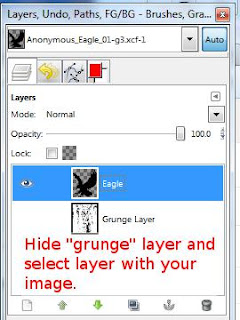
 5. Hide the grunge layer by clicking on the "eye" icon (this is actually
optional, but I think it makes it easier to see what you are doing) and
click on the layer that has
the image you want to grunge up and press "Delete" or ctrl+X. Press
shift+ctrl+A (or choose Select from the menu bar and then None) to
unselect the "grunge" texture.
As you can tell, a lot of the tail area on this eagle got removed. You can use some grunge brushes to erase some additional areas and fill in some areas where too much areas had been removed.
(There are many grunge brushes that are free to use on the Internet...just search for GIMP or Photoshop grunge brushes. If you are using a GIMP 2.4 and above you should be able to use Photoshop brushes. Just make sure the creator of the brushes allows for commercial use of them if you intend to use your design on print on demand sites or other commercial purposes.)
Or copy and paste bits of the image to fill in areas. Experiment to find what works for you.
You could use this info to create your own GIMP brushes too if you wanted. Here's some links about making GIMP brushes if you are interested.
http://www.gimp.org/tutorials/Custom_Brushes/
http://www.gimptalk.com/index.php?/topic/445-lets-create-some-brushes/
1. Open a photo of something with a lot of texture in GIMP. (I used an image of a photo I took of part of some metal that was rusty, had peeling paint, gouges, etc. in it. You can also find pictures like this online that are free for commercial use. You can try searching for things like "free textures" or "free textures for photoshop", etc and find some. Here is one source. http://mayang.com/textures)
2. Click on Colors in the menu bar. Chose "Threshold." This turns the layer into a black and white image (you can mess with the options to get the balance of white and black that you want). Click on Okay when you are done. If you like you can also then click on Colors from the menu and then Invert to switch the black and white colors.
This is the result I got.
4. Use the color select tool to either select the white or black part of the texture (choose whichever one you think will give you the results you want).
 5. Hide the grunge layer by clicking on the "eye" icon (this is actually
optional, but I think it makes it easier to see what you are doing) and
click on the layer that has
the image you want to grunge up and press "Delete" or ctrl+X. Press
shift+ctrl+A (or choose Select from the menu bar and then None) to
unselect the "grunge" texture.
Here are my results.
As you can tell, a lot of the tail area on this eagle got removed. You can use some grunge brushes to erase some additional areas and fill in some areas where too much areas had been removed.
(There are many grunge brushes that are free to use on the Internet...just search for GIMP or Photoshop grunge brushes. If you are using a GIMP 2.4 and above you should be able to use Photoshop brushes. Just make sure the creator of the brushes allows for commercial use of them if you intend to use your design on print on demand sites or other commercial purposes.)
Or copy and paste bits of the image to fill in areas. Experiment to find what works for you.
You could use this info to create your own GIMP brushes too if you wanted. Here's some links about making GIMP brushes if you are interested.
http://www.gimp.org/tutorials/Custom_Brushes/
http://www.gimptalk.com/index.php?/topic/445-lets-create-some-brushes/
Subscribe to:
Posts (Atom)


